INTRODUCTION
The websites we build often require accepting a payment for something that isn't a product. For example, service payments, down payments or donations. There are different ways to handle this with Drupal Commerce and here we’ll outline the method we've adopted for use and explain how to implement it yourself.
CREATE A CUSTOM MODULE
To accept payments of varying amounts in Drupal Commerce you will need a custom line item type as well as a few other customizations. Although you can achieve this with contrib modules like Commerce Custom Line Item Types, we prefer to create our own module that will contain all of the logic needed for our payments. This not only provides a more concise way to achieve our goal, but it also allows us to put all of the pieces needed into one module, which is great for organization.
First, let’s create our custom module. For this example, we’ll call our module custom_commerce. If you’re not familiar with creating a custom module for Drupal yet it’s actually quite easy. There are many resources available to help you get started, our quick start article is Creating a Basic Drupal 7 Module.
Your module will start with the following two files: custom_commerce.info and custom_commerce.module. Please these two files into a folder called customer_commerce.
.INFO file
The .info file should contain something like:
name = Custom Commerce Code
description = Handles varying payments, etc.
core = 7.x
package = Commerce (custom)

dependencies[] = commerce
.MODULE file
The first step is to tell Drupal Commerce about our new, custom line item type. We'll do this by using hook_commerce_line_item_type_info() as shown below. You can adjust the names and description as needed for your situation.
<?phpfunction custom_commerce_commerce_line_item_type_info() { $line_item_types = array(); $line_item_types['payment'] = array( 'type' => 'payment', 'name' => t('Payment'), 'description' => t('A payment or Donation'), 'product' => TRUE, 'add_form_submit_value' => t('Add Payment'), 'base' => 'commerce_product_line_item', ); return $line_item_types;}?>
That's all there is to creating a new custom line item type. Once you save this code and enable your new module you will see your new line item type under STORE->CONFIGURATION->LINE ITEM TYPES
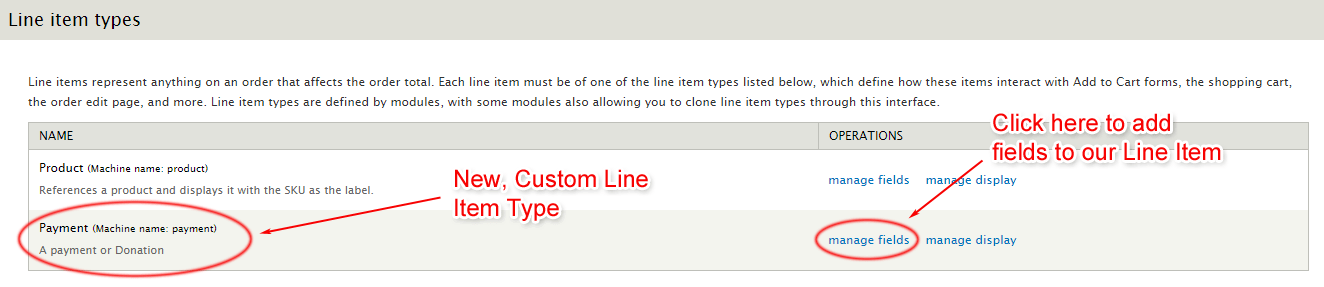
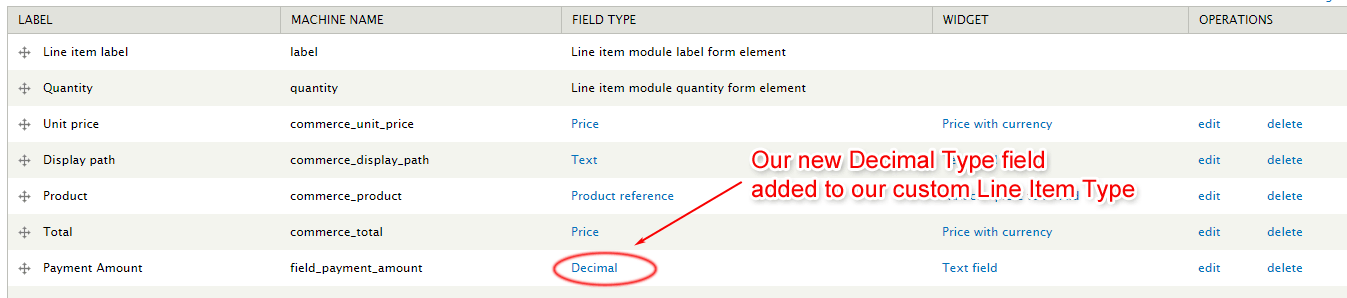
Now, from the Line Item Types configuration screen, click the Manage Fields link for your new Line Item Type and add a new Decimal type field. You can name this field Donation, Payment, or whatever is relevant for your situation.
CREATE A PRODUCT
Now create a new Commerce "Product" for your Payment or Donation by navigating to STORE->Add a Product. Give your new Product a SKU (such as PAYMENT) a title and a price of $0. After saving your new Product take note of its Product ID number as you'll use this in your custom module below.
Note that you can create a custom product type for your Donations or Payments if you'd like. In our case, we're not selling any products at all so we removed the default Product product type and added a new Payment product type in instead. We then used this new product type to create our Payment product to be used for our payments.
PRODUCT PROCESSING
In this next step, modify (as needed) and add the following code into your custom_commerce.module file. This function is the callback from our second menu item we created. This function is called when our custom Add to Cart form (created in a following step) is submitted. This function will create a new Order object for the current user and then create a new line item in the order using your product and custom line item. It will then direct the user directly to the checkout page.
<?php/* * Menu call back to add customer payment amount to cart, create order and direct to checkout */ function custom_commerce_cart_line_item_add() { $amount = arg(1); // Load payment amount from URL argument global $user; $product_id = 1; // this is the product id number of your payment/donation product if ($product = commerce_product_load($product_id)) { // Create and save new order object for user $order = commerce_order_new($user->uid, 'checkout_checkout'); commerce_order_save($order); // Create a new line item using our custom line item type and attach it to our order $line_item = commerce_product_line_item_new($product, 1, $order->order_id, array(), 'payment'); // "payment" is the name of our custom line item type. commerce_line_item_save($line_item); $line_item_wrapper = entity_metadata_wrapper('commerce_line_item', $line_item); $line_item_wrapper->field_payment_amount->set($amount); $line_item_wrapper->save(); $order_wrapper = entity_metadata_wrapper('commerce_order', $order); $order_wrapper->commerce_line_items[] = $line_item; commerce_order_save($order); drupal_set_message('A customer message can be displayed if desired.'); // Redirect to checkout page now drupal_goto('checkout/' . $order->order_id); } }?>
Form API
Now we could create a Commerce Display Node to handle the displaying of our Add to Cart form but we're going to create our own form instead using Drupal's Form API (FAPI). This will allow us to have complete control over the Add to Cart form and functionality as well as negating the need for a Node to display our Add to Cart.
The first step is to use hook_menu to create two menu links. Insert code similar to the following into your custom_commerce module. This will create two menu router items. The first one (user/payment) is to display the form. The second (add-payment) is to process the payment/donation. Of course, adjust this code as needed for your situation.
<?php /** * Implementation of hook_menu(). */function custom_commerce_menu() { $items['user/payment'] = array( 'title' => 'Make a payment', 'file' => 'custom_commerce_payment.inc', 'page callback' => 'drupal_get_form', 'page arguments' => array('custom_commerce_payment_form'), 'access arguments' => array('access checkout'), 'type' => MENU_NORMAL_ITEM, ); $items['add-payment'] = array( 'type' => MENU_CALLBACK, 'page callback' => 'custom_commerce_cart_line_item_add', 'access arguments' => array('access checkout'), ); return $items;}?>
Now, create a new file in your custom_commerce module called, custom_commerce_payment.inc. This file will contain your custom Add to Cart form code. In this new file place your form code similar to the following:
<?phpfunction custom_commerce_payment_form($form, &$form_state) { $form['amount'] = array( '#type' => 'textfield', '#title' => t('Enter Payment Amount'), '#required' => TRUE, '#default_value' => 0, // Add a default value here if desired '#size' => 20, '#maxlength' => 20, '#attributes'=> array('placeholder' => '$'), ); $form['submit'] = array( '#type' => 'submit', '#value' => 'Proceed to the next step', ); return $form;}// Here we'll validate the payment amount. First we'll strip any dollar signs and then make sure the value is a number larger than 0function custom_commerce_payment_form_validate($form, &$form_state) { $values = $form_state['values']; $str = str_replace('$', '', $values['amount']); if (!is_numeric($str)){ form_set_error('amount', 'Please enter a valid payment amount.'); } if ($str <= 0){ form_set_error('amount', 'Please enter a valid payment amount.'); } $form_state['values']['amount'] = $str; }// Menu callback to add payment to cartfunction custom_commerce_payment_form_submit($form, &$form_state) { $amount = $form_state['values']['amount']; drupal_goto('add-payment/' .$amount); // This is our menu callback used to handle the payment }?>
There is extensive documentation for Drupal's Form API online. You can use this API to customize your form, validation and submit function as needed for your situation. This will allow you a great amount of control and flexibility over your Payment or Donation's functionality.
RULES
The last step is to create a Rule to Calculate the Sell Price of our new payment or donation. Our new Rule will contain something similar to:
- EVENT: Calculation the Sell price of a product
- CONDITION: Entity has field
- Set the field to the field you created in your Custom Line Type
- Actions:
- Calculate a value, using the custom Line Item field times (*) 100 and set the variable name to Result
- Set the unit price to a specific amount, using the Result variable
We've made an export of our Rule available for download here. You can import and use this Rule on your site if the Custom Line Item Type's payment field name is "field_payment_amount". Otherwise, Rules will give you a validation error when trying to import it.
NOTE:
As of this writing, there is an issue with the latest release of Rules (2.8) that causes the price calculations to fail. You must use the 2.7 version of Rules, or, once released, a version past 2.8 (more info)
PUTTING IT ALL TOGETHER
This may seem a bit complicated but in actuality, once you understand the basics, we were able to use a few lines of code in our custom Drupal module to create a self-contained payment or donation system that allows us complete control over the Add to Cart form and processing logic. Once you've adapted and used the above steps you should now have an Add to Cart form available at the URL you specified in your hook_menu (user/payment). You can adjust this URL as needed, including limiting access. Our completed custom Add to Cart form looks like this:
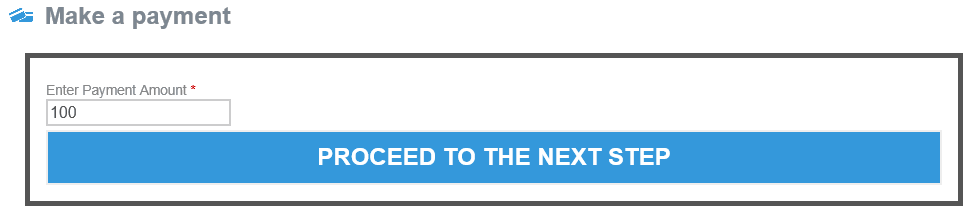
And clicking the "Next Step" button performs our custom form validation and submit functions, creating the custom line item, adding it to the cart and then redirecting the user to the checkout page. We've also created a one page checkout to make the process as quick and simple as possible for our customers.